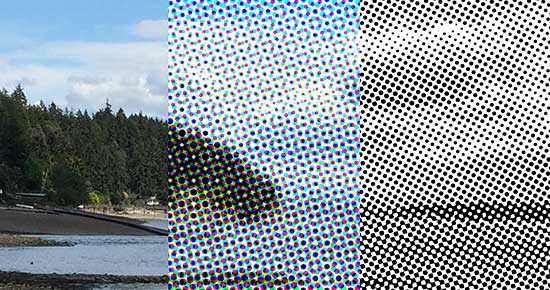
Halftone dots are present in magazines, newspapers, as well as screen printed garments. If you look at an image on a newspaper it will seem as though it is continuous. However, if you look even closer, you’ll now realize it is actually thousands of tiny dots. These dots are known as halftone dots. This image is created in photo-shop creating an illusion. This illusion is perfected by making some dots smaller and others larger. The smaller the dots are the darker the area of the image will appear, as shown in the photo below. I will go through the process to create these results yourself.
OPTION 1:
COLOR HALFTONE FILTER
FILTER>PIXELATE>COLOR HALFTONE
On a color image, you get multiple halftones that overlap.
On a grayscale image, you get circular dots that grow larger and larger.
OPTION 2:
BLACK AND WHITE HALFTONE
1. Convert RGB image to Grayscale
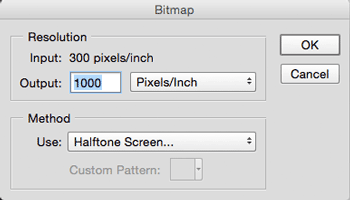
2. IMAGE>MODE SUBMENU>SELECT BITMAP
3. METHOD>HALFTONE SCREEN>OK
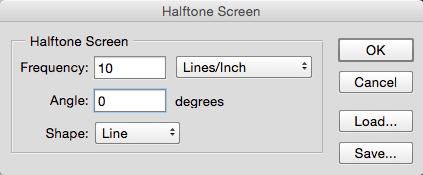
4. Select Frequency, Angle, Shape (Each comes out differently)
-Frequency (Lines/Inch) – The lower the frequency – The larger the spots
-Angle (Degrees)
-Shape (Circle, Line, Cross, etc)
5. Resolution- Control the resolution on the output field in the bitmap dialog box. Set resolution to 1000, 1,500, or 2,000ppi. This will create a smooth edge on your halftones.
6. Save as PSD or TIFF file
7. Place in InDesign and color your image.
The halftone effect lets you create TONS of variations from your images. Experiment until you figure out what works best.
 How to Create Halftone Dots in Photoshop